Kia Ora , fellow outdoor enthusiasts!
Did you know that a whooping 80% of Kiwis go camping at least once a year?
Whether you are planning a trip to stunning ever Tasman or the Rugged for your land, knowing how its pitch attend is in essential skill for any New Zealand Adventurer.
But don’t worry if you are a newbie dash we have got you covered!
In this guide, we will walk it through 7 dead easy steps to get your tent up faster than you can say sweet as! And this is must-have point in your camping guide.
So grab your gumboots and let’s dive in!
Step 1 : Choose The Perfect Spot
Okay, So let’s chat about finding the sweet spot for your tent.
I’ve been camping all over New Zealand for quite some time now, and crikey, have I made some rookie mistakes!
Remember that time I pitched my tent in a little gully? I thought I was clever, all sheltered and that. Well, it chucked it down that night, and I woke up practically swimming!
And a lesson learned: always check if you’re in a spot that might turn into a mini lake.
So, here’s what you need to know when choosing a primo spot:
First up, you want flat, dry ground. It’s very obvious, but you’d be surprised.
No one fancies sliding to one corner of their tent all night. Take your time to find a nice level patch.
Once you’ve found a likely spot, get down and clear away any sticks or rocks.
Your back will thank you later. Trust me, I’ve spent a night with a stone digging into my ribs – not ideal!

Think about the elements too. Our Kiwi weather can be a bit unpredictable, so look for natural windbreaks.
A stand of trees or a hillside can be a choice. But don’t pitch too close to trees – you don’t want any surprises if a branch decides to come down.
Sun exposure is another thing. In summer, a bit of shade keeps your tent from turning into a sauna. In cooler months, catching the morning sun can be lovely for warming up.
Oh, and always check for overhanging branches or dead trees. I once had a close call with a “widow maker” – scared the living daylights out of me when it crashed down in the middle of the night!
If you’re new to camping, try the Department of Conservation (DOC) campsites. They usually have decent, pre-cleared spots for tents.
Remember, a good spot can make or break your trip. Take your time and don’t be afraid to move if your first choice doesn’t feel right.
Step 2: Lay out And Assemble Your Tent Components
Alright, now let’s talk about getting your tent bits and bobs sorted. I remember my first time camping in the Coromandel – what a mission It was!
I tipped out my new tent and stared at the pile like it was a jigsaw puzzle from hell.
So to start with , you want to unpack everything and lay it out. It’s like unpacking the Christmas pressies, but with more nylon.
Get it all spread out on the ground so you can see what you’re dealing with.
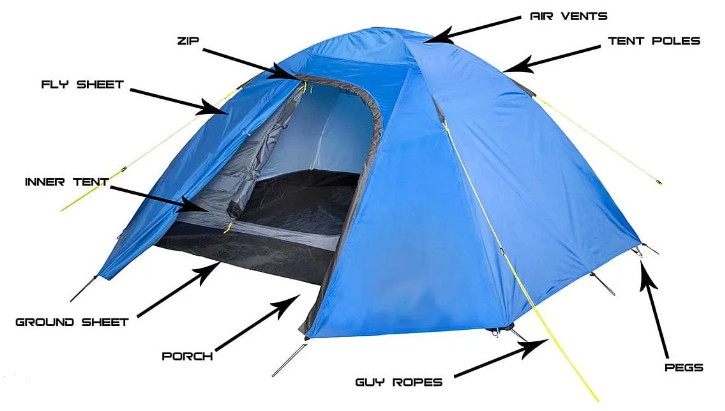
Now, let’s play a game of “spot the important bits”. You’re looking for the groundsheet (that’s the fancy name for the bit that goes on the ground), the tent body (the main part), the poles (those long pokey things), and the rainfly (the extra layer that keeps you dry when it’s bucketing down).
Take a moment to familiarise yourself with how it all fits together.
Most tents these days are pretty straightforward, but it pays to have a squiz at the instructions. No shame in that – even us old hands do it sometimes.
Here’s a top tip: count everything. Make sure you’ve got all the pegs, poles, and bits of string. Nothing worse than getting halfway through and realizing you’re short a crucial piece.
Remember, setting up your tent is like making a pavlova – take your time, follow the recipe, and it’ll turn out perfectly fine .
Step 3 : Set Up the Groundsheet or Footprint
So, you’ve now found your spot and now it’s time to lay down that groundsheet.
Sounds easy, yeah?
Well, let me tell you about the time I mucked it up big time on a camping trip near Rotorua.
I just chucked the groundsheet down without thinking, and wouldn’t you know it, I put the thing upside down!
Didn’t realise till it started raining, and suddenly my tent floor was a swimming pool.
Not ideal when you’re trying to have a relaxing weekend away!
Here’s what I’ve figured out since then:
First up, spread that groundsheet out nice and flat. Make sure you’ve got it the right way round – usually the shiny bit goes up. If you’re not sure, check your tent’s instructions. Yeah, I know, reading instructions isn’t very Kiwi, but trust me, it helps!

Next, line it up proper with where your tent’s gonna go. Most groundsheets are shaped to match the tent, so it should be pretty obvious. If it’s not, just centre it where you reckon the tent’ll sit.
Now, if it’s a bit windy (and let’s face it, when isn’t it in NZ?), you might wanna peg down the corners. Just a couple of pegs should be fine – you don’t want it blowing away while you’re sorting the rest of your gear.
Last thing – and this is very crucial – trim or tuck any extra bits of the groundsheet that stick out past your tent. If you leave them, they’ll collect water faster than a pohutukawa collects bees in summer. And that’s a surefire way to wake up in a puddle!
Always remember, a good groundsheet setup is your first defence against a soggy sleeping bag. Take your time with it, and you’ll be fine for the rest of your trip.
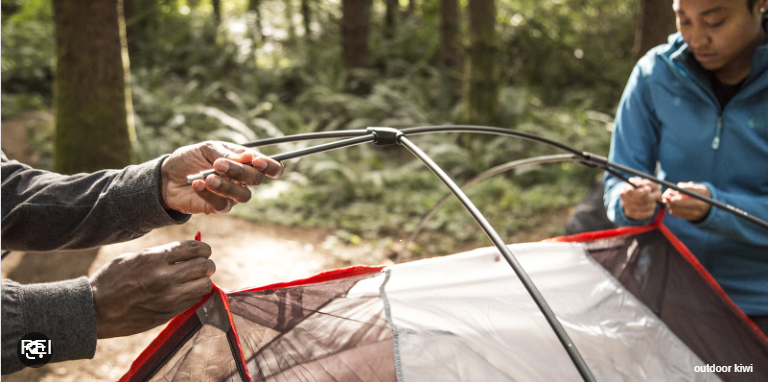
Step 4 : Assemble and Erect the Tent Frame
Okay, Now it is the time to grab those tent poles and have a squiz at the instructions.
Yeah, I know, reading’s not our strong suit, but trust me, it helps. Connect them up following the manual – they usually click together pretty easy.
Now, you’ve gotta thread those poles through the sleeves on your tent. It’s like threading a giant needle, but don’t rush it. I once got impatient and ripped a sleeve.
Once they’re all threaded, it’s time to raise this bad boy. Start from one end and slowly work your way to the other. It might look a bit wonky at first, but don’t stress – it’ll sort itself out.
Make sure all the poles are fully extended. You should hear a satisfying ‘click’ when they lock into place.
Take your time with this step. A properly set-up frame means your tent won’t collapse on you in the middle of the night. Believe me, waking up with a face full of canvas is not how you want to start your day!
Step 5 : Secure the Tent to the Ground
Okay, first grab your tent pegs. Make sure they are sturdy ones. Those flimsy ones from the $2 shop won’t cut it in our Kiwi weather.
Now start with the corners. Bang those pegs in at about a 45-degree angle, pointing away from the tent.
It’s not a straight-down job – that’s a rookie mistake I made once. Angling them gives a better grip when the wind picks up.
Now, don’t just whack them in willy-nilly. Think about the ground you’re on. If it’s soft, you might need to go deeper or use wider pegs. On rocky ground, you might need to get creative with big stones to hold things down.

Once the corners are sorted, work your way around the tent, pulling it nice and taut as you go. You want that floor as flat as a pancake – no saggy bits to trip over in the dark.
Remember, a well-pegged tent is your home away from home. Take your time doing it right, and you’ll sleep easy, rain or shine.
Step 6: Attach and Tension the Rainfly
Okay now, time to chuck on that rainfly. Bit like putting a raincoat on your tent, this one.
So, you’ve got your tent standing proud. Now, grab that rainfly and drape it over the top. Sounds dead simple, but don’t rush it, mate.
I once put mine on backwards and spent half the night wondering why I couldn’t find the door!
Make sure you line up the doors and windows proper. Nothing worse than fumbling around in the dark because your fly door’s out of whack with your tent door. Trust me, I’ve been there!
Next up, clip it all in. There’s usually some little attachment points to secure the fly to your tent body. Don’t be a muppet and skip this bit – I did once and woke up to find my rainfly halfway to Hamilton in a stiff breeze.

Last thing, sort out those guy lines. You want them tight enough to keep things snug, but not so tight you’re warping your tent shape. It’s a bit of a Goldilocks situation – not too loose, not too tight, just right.
Take your time with this step. A well-fitted rainfly is your best mate when the weather turns sour. And let’s face it, in Godzone, that could be any minute!
Step 7 : Final Adjustments and Weather Proofing
Let’s wrap this up with some final tweaks. This is the bit where you really weatherproof your home away from home. I learned the hard way on a soggy trip to the Coromandel – you don’t want to skip this!
First up, give those guy lines another once-over. They’re like your tent’s seat belts, keeping everything snug when the wind picks up.
I once neglected this and spent half the night chasing my fly around the campsite. Not ideal when you’re in your jocks!
Next, sort out your ventilation. Open up those vents, even if it seems a bit daft. You don’t want to wake up in a sweat box that smells like last night’s boil-up.
If you’ve got wet togs or towels, sling up a clothesline nearby. Just don’t put it too close, or you might end up with a midnight face-full of damp undies.
Lastly, if the weather looks iffy , dig some little channels around your tent. Nothing fancy, just enough to guide water away.
I once woke up in an accidental moat because I skipped this step. Talk about a rude awakening!
Conclusion
There you have it,your 7-step guide to pitching a tent like a true Kiwi camping pro!
With these skills under your belt, you’re all set for countless adventures in Aotearoa’s stunning backyard. Remember, practice makes perfect, so why not have a go in your backyard before heading out to the wop-wops?
And don’t forget, respecting our beautiful environment is key – always follow the Tiaki Promise and leave no trace.
Now, grab your chilly bin, round up your mates, and get ready for an unforgettable camping experience.
Happy camping, New Zealand!
FAQ
Best tent for NZ’s unpredictable weather?
Go for a 3-season tent with 3000mm+ waterproof rating. Macpac or Kathmandu are good local options. Seam-seal for extra protection against our notorious southerlies!
Keeping sandflies out when camping?
Use fine mesh screens, set up away from still water, shake gear before entering, and zip up quick. Chuck a mozzie coil nearby for good measure.
Is freedom camping legal anywhere in NZ?
Nope, not everywhere. Check local council rules and stick to designated spots. When in doubt, use DOC campsites.
Pitching on rocky NZ backcountry ground?
Bring sturdy pegs, use rocks as anchors if needed. Freestanding tents are choice. Always pack a repair kit for sneaky tears.